What is Deferred Shading?
Let’s say that you are using forward rendering : a naive rendering technique where you render objects and perform lighting calculations for each one of them. What could possibly go wrong with this approach 🤔?
The fact is that lighting can be very extremely performance heavy, and in forward rendering, we make a lot of pixel shader invocations: most of which will be unnecessary, wasting resources and computational power as those results will simply be overwritten by the shading computations of other objects whose mesh covers / overlaps the previous object’s mesh.
This is worsened by the fact that with a large number of lights in the scene, the unnecessary computations are of the order Number of pixels * Number of lights
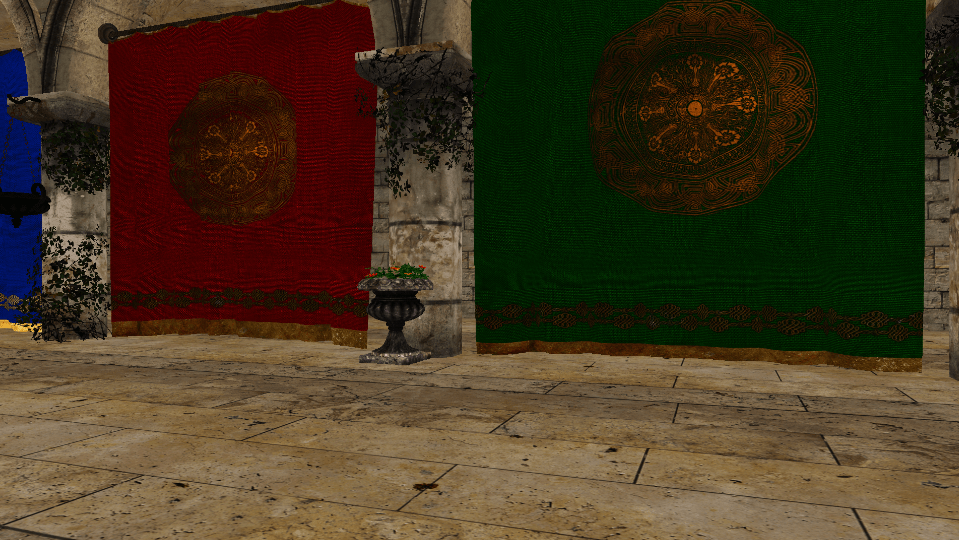
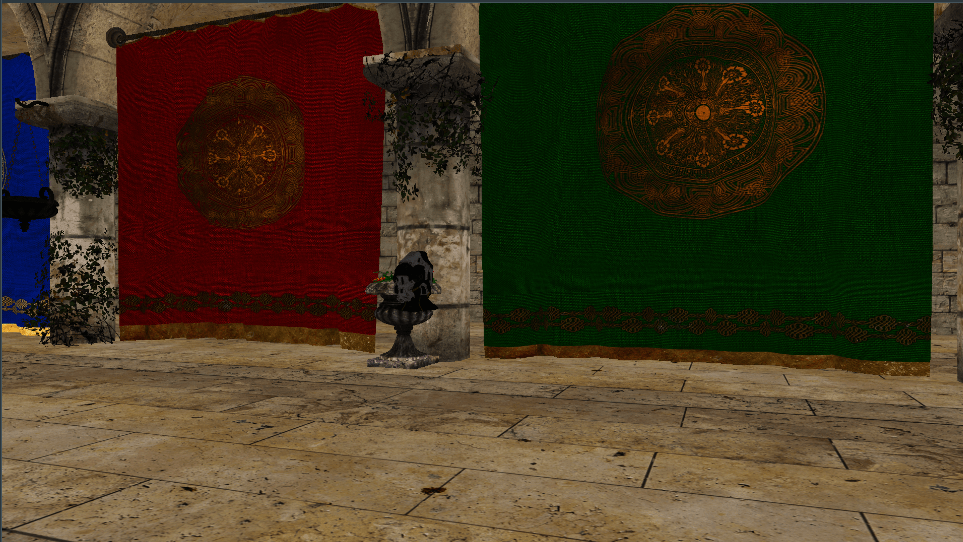
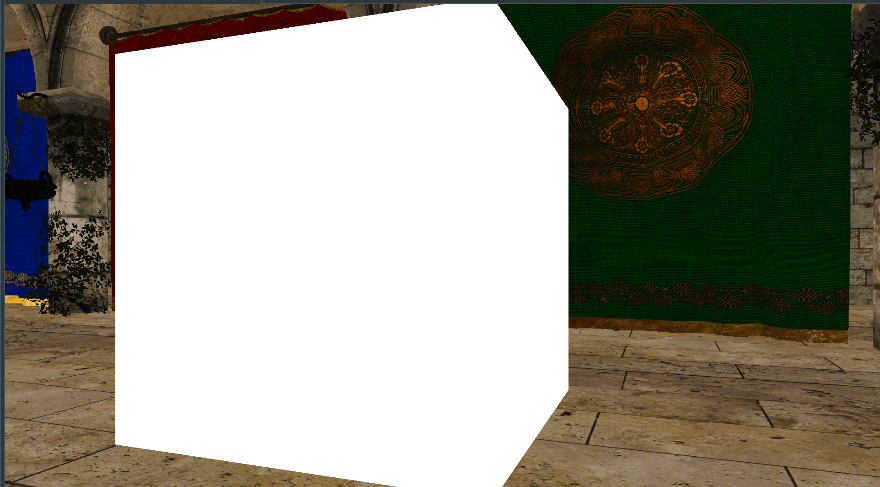
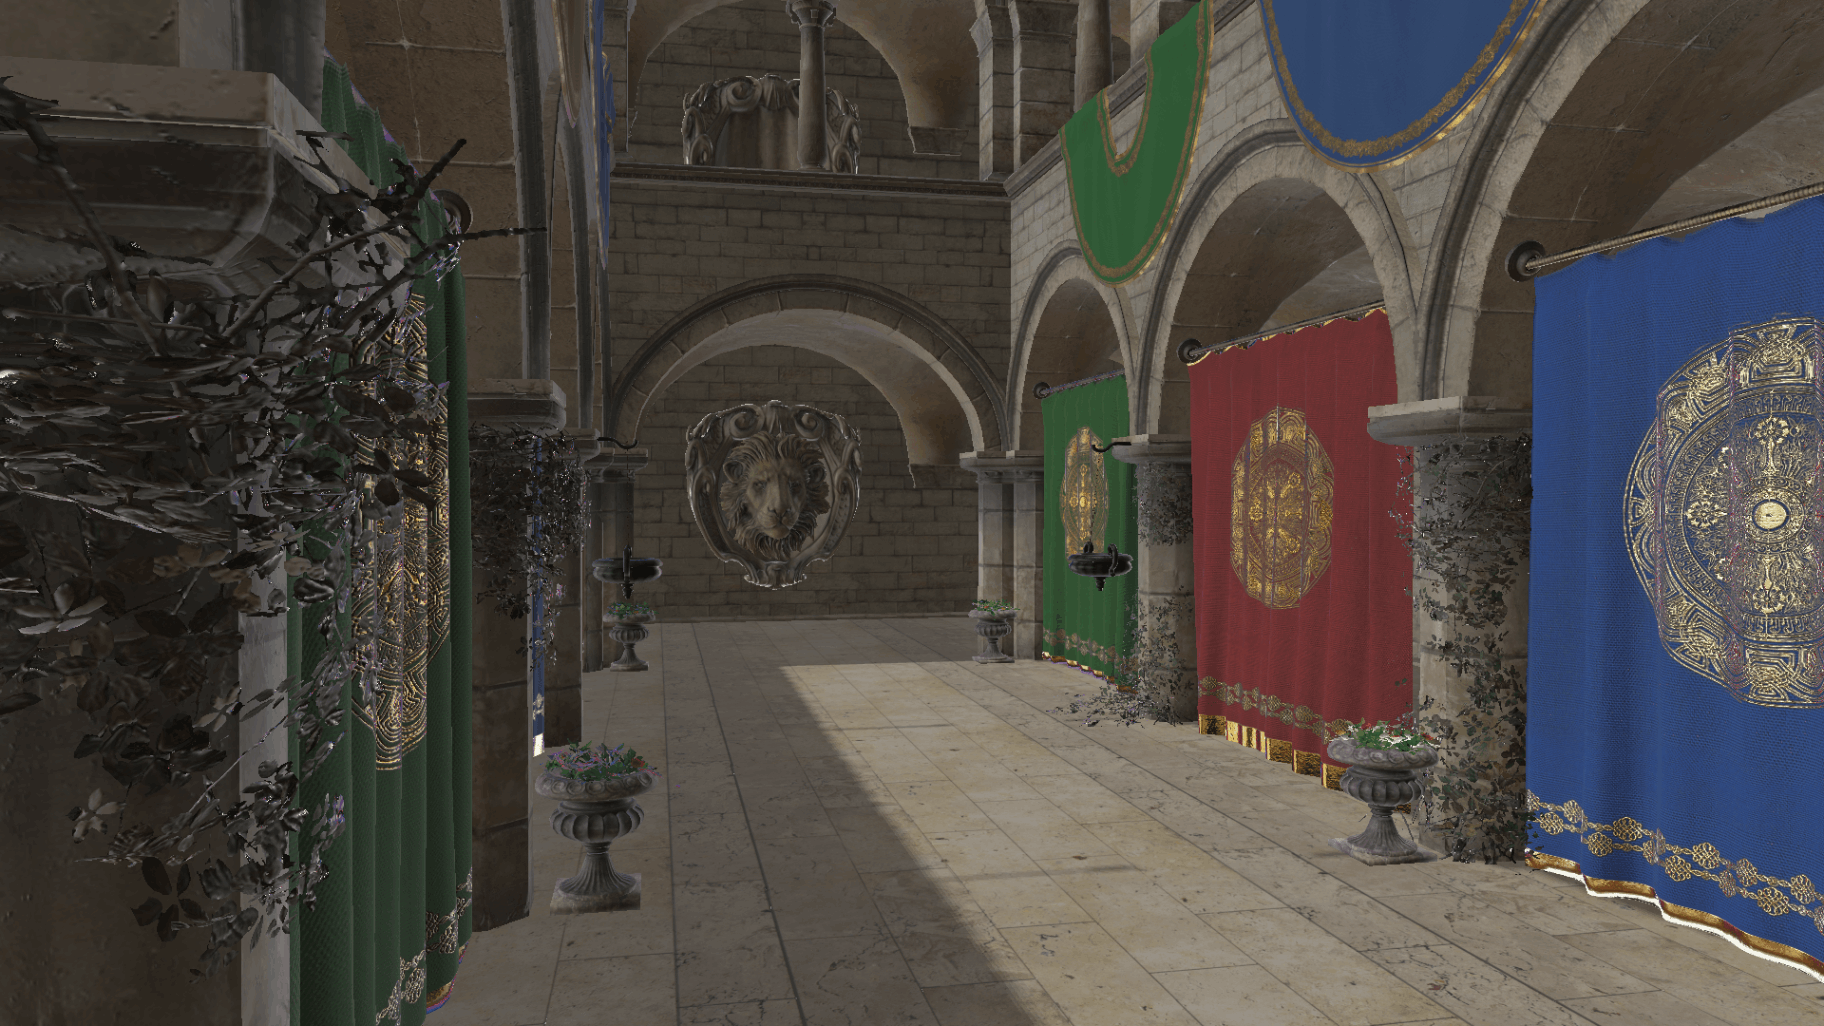
Take a look at these series of images for a visual example :
Focus on the pillar between the red and green curtains!
The flower pot covers some part of the pillar, which performed some shading computations in the previous draw call.
The helmet model covers parts of the flower pot, making the previously computed results wasted 😔
We render another helmet that completely covers the previously rendered helmet & flower pot. That’s a lot of wasted computation 😨

Most of the scene is now covered with a simple cube 😡 for such a simple output, we made the GPU perform a lot of work for nothing!
Notice how a lot of objects basically ‘overlap’ each other. By performing lighting calculations on each object we render, we perform a lot of unnecessary computations and shader invocations. For very large scenes, forward rendering would bring down the performance a lot (even if we reduce the number of vertex shader invocations, the pixel shader is often the bottleneck in the graphics pipeline). Deferred shading helps us prevent this by making sure no unnecessary shading computation occur ❤️.
How Deferred Shading Works
We perform shading calculations, only for those pixels/fragments that will actually be visible to the end user. How do we do this?
We essentially record all the variables and values that our lighting computations require in multiple render targets (MRTs). This means we can render the entire scene first while capturing said results required for shading. Then, we render a full-screen triangle where we perform shading computations only for the pixels that actually require it!
This technique gets its name since we are deferring our shading calculations 😄
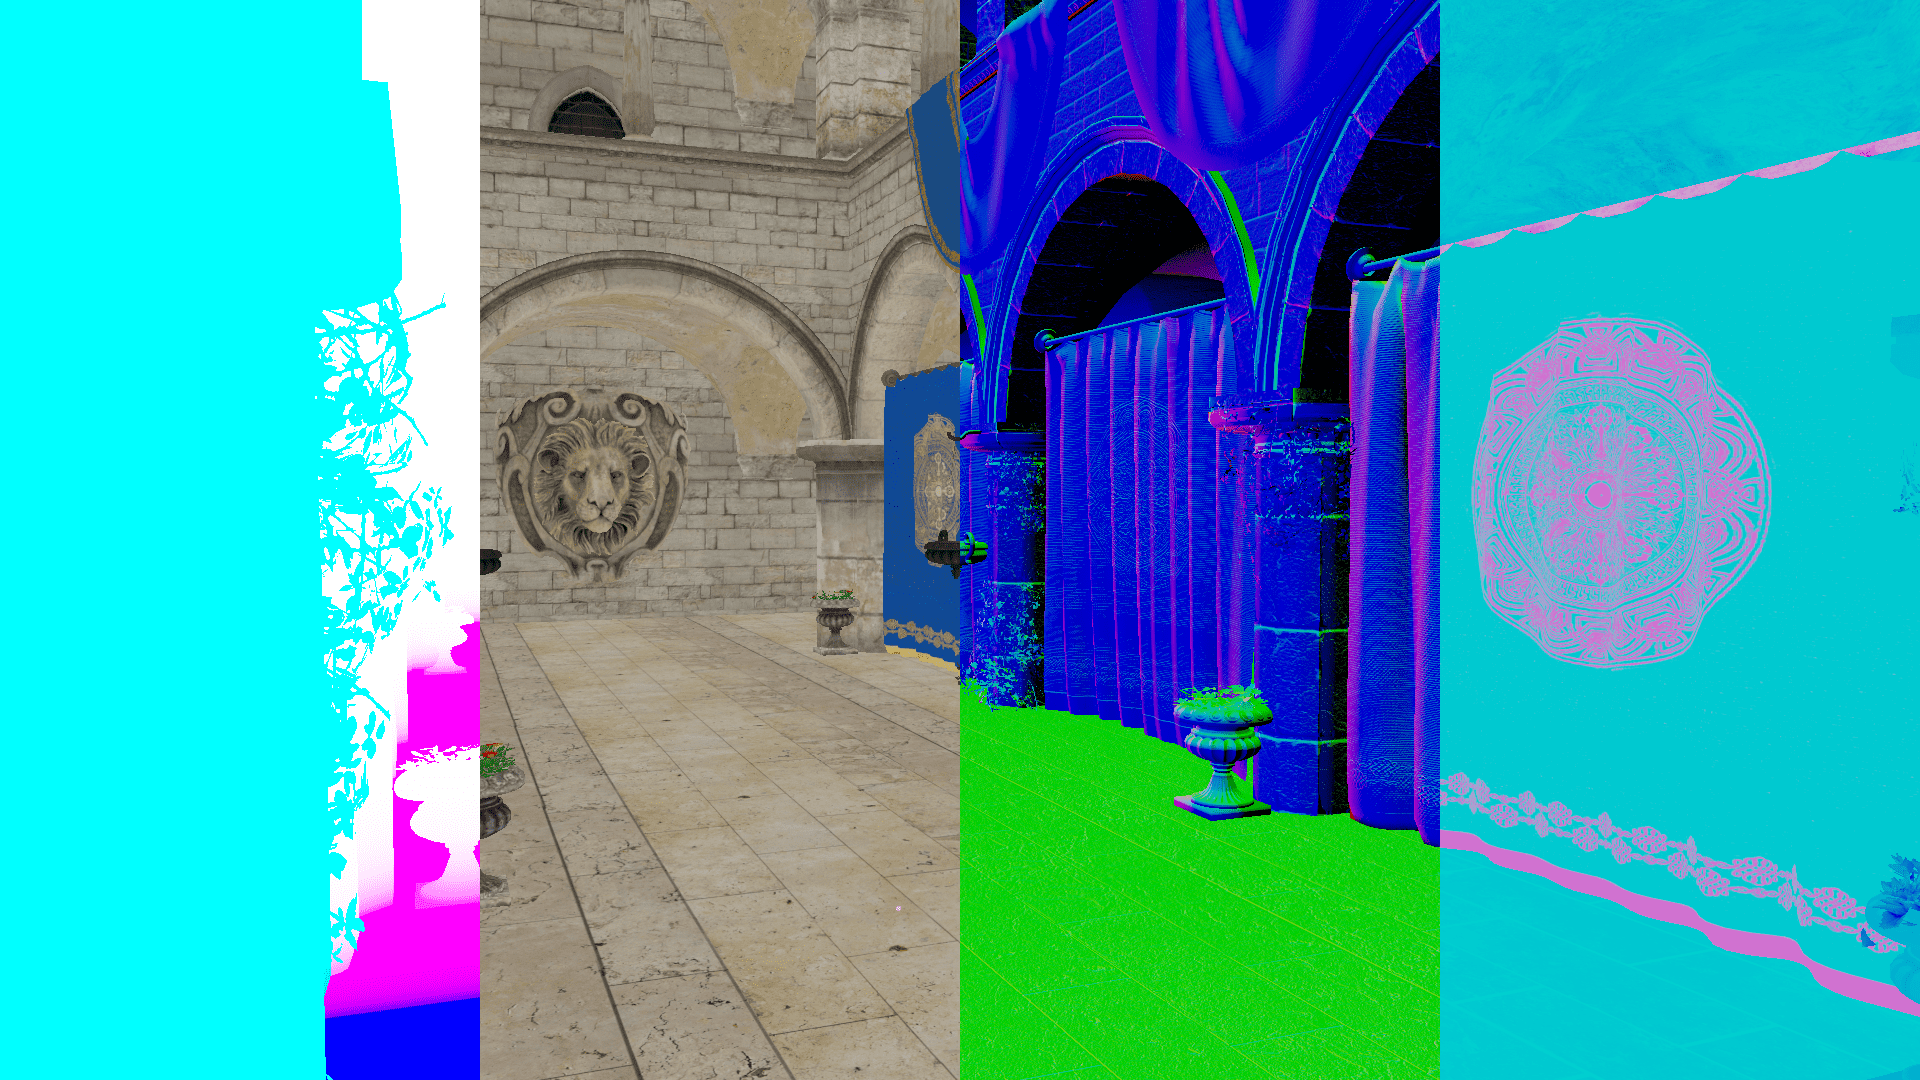
The render pass where we capture all values/information required for shading is called the Geometry Pass or G Pass. The values we commonly store are the :
- Positions
- Normals
- Albedo Color
- Metal / Roughness values
- Ambient Occlusion values
- Emissive values, etc.
We save these results in multiple textures (i.e multiple render targets). This is also called the G Buffer, or Geometry Buffer ✅.
From left to right: Position data, Albedo colors, Normal data, Metal / Roughness data.

Then, we perform a Shading / Lighting Pass where we render a full-screen triangle or quad and use the values stored in the G Buffer to calculate the scene lighting -> with no wasted computations, since the shading per pixel is computed only once as the pixels that are stored in the G Buffer are the fragments visible to us 🚀.
Final result after performing PBR shading computations using values from the G Buffer.
Packing the GBuffer Efficiently
As you can imagine, storing the position / normal data would require us to use high-precision floating-point texture formats such as R16G16B16A16_FLOAT (as these values do not lie in a simple integer 0-1 format). Moreover, we need multiple such textures (all of which have the dimensions of the swapchain backbuffer we are going to present). This makes our G Buffer extremely large in size, because of which we try to pack values in the G buffer tightly together.
As storing each value in its own textures would simply be extremely memory inefficient (and in Direct3D11 and Direct3D12 we can have a maximum of 8 render targets set at once), we will pack the G Buffer tightly. For example, store the data in formats such as :
gfx::GBuffer gBuffer =
{
    // albedoRT.xyza stores the albedo value of the object.
    // We use a R8G8B8A8_UNORM format as the albedo texture is of this  format.
    albedoRT = createRenderTarget(FORMAT_R8G8B8A8_UNORM);

    // positionEmissiveRT.xyz stores the object position is whatever space shading computations are happening in (say, view space).
    // positionEmissiveRT.w stores the red channel of the objects emissive texture.
    // We use a R16G16B16A16_FORMAT here, as the position is in floating point format and requires high precision.
    positionEmissiveRT = createRenderTarget(FORMAT_R16G16B16A16_FLOAT);

    // normalEmissiveRT.xyz stores the objects view space normals.
    // normalEmissiveRT.a stores the green channel of the objects emissive texture.
    // We use a R16G16B16A16_FORMAT here, as the normal is in floating point format and requires high precision.
    normalEmissiveRT = createRenderTarget(FORMAT_R16G16B16A16_FLOAT);

    // aoMetalRoughnessEmissiveRT.x stores the ambient occlusion factor of the PBR material of the object.
    // aoMetalRoughnessEmissiveRT.yz stores the metallic and roughness  factors of the PBR material.
    // aoMetalRoughnessEmissiveRT.a stores the blue channel of the emissive texture.
    aoMetalRoughnessEmissiveRT = createRenderTarget(FORMAT_R8G8B8A8_UNORM);
};
Note❗: Try to use non high-resolution floating point resolution textures for your MRTs as much as possible, as they require a lot of memory bandwidth!
The G Pass will be used to save results in the above-created textures. It is fairly simple to implement the G Pass as well. Set your MRTs for the draw call and ensure that your pixel shader outputs all values to multiple render targets as follows :
// On the CPU / Application side:
graphicsDevice->SetRenderTargets(gBuffer, depthBuffer);

// On the HLSL / Shader side:

// positionEmissive : .xyz is position, .w is emissive.r
// normal emissive : .xyz is normal, .w is emissive.g
// aoMetalRoughness : .x is ao, .y is metallic factor, .z is roughness factor, .w is emissive.b
struct PsOutput
{
    float4 albedo : SV_Target0;
    float4 positionEmissive : SV_Target1;
    float4 normalEmissive : SV_Target2;
    float4 aoMetalRoughnessEmissive : SV_Target3;
};

[RootSignature(BindlessRootSignature)]
PsOutput PsMain(VSOutput psInput)
{
    PsOutput output;

    output.albedo = GetAlbedo(psInput.textureCoord, renderResource.albedoTextureIndex, renderResource.albedoTextureSamplerIndex);
    float3 emissive = GetEmissive(psInput.textureCoord, renderResource.emissiveTextureIndex, renderResource.emissiveTextureSamplerIndex);

    output.positionEmissive = float4(psInput.worldSpacePosition, emissive.r);

    output.normalEmissive = float4(GetNormal(psInput.textureCoord, renderResource.normalTextureIndex, renderResource.normalTextureSamplerIndex, psInput.normal, psInput.tbnMatrix), emissive.g);

    const float ao = GetAO(psInput.textureCoord, renderResource.aoTextureIndex, renderResource.aoTextureSamplerIndex);
    float2 metalRoughness = GetMetalRoughness(psInput.textureCoord, renderResource.metalRoughnessTextureIndex, renderResource.metalRoughnessTextureSamplerIndex);

    output.aoMetalRoughnessEmissive = float4(ao, metalRoughness, emissive.b);

    return output;
}
Note❗: Ensure that all vectors reside in the same coordinate space! (usually, shading algorithms are implemented in either view or world space).
The Lighting Pass
We can retrieve data from the G Buffer stored using the G Pass and perform our lighting calculations 🎊
While computing shading results from the pixel shader, we can sample from the G Buffer and extract/reconstruct the values we require :
// Sample and extract data for the GBuffer's.
Texture2D<float4> albedoTexture = ResourceDescriptorHeap[renderResource.albedoGBufferIndex];
Texture2D<float4> positionEmissiveTexture = ResourceDescriptorHeap[renderResource.positionEmissiveGBufferIndex];
Texture2D<float4> normalEmissiveTexture = ResourceDescriptorHeap[renderResource.normalEmissiveGBufferIndex];
Texture2D<float4> aoMetalRoughnessEmissiveTexture = ResourceDescriptorHeap[renderResource.aoMetalRoughnessEmissiveGBufferIndex];

const float4 albedo = albedoTexture.Sample(pointClampSampler, psInput.textureCoord);
const float4 positionEmissive = positionEmissiveTexture.Sample(pointClampSampler, psInput.textureCoord);
const float4 normalEmissive = normalEmissiveTexture.Sample(pointClampSampler, psInput.textureCoord);
const float4 aoMetalRoughnessEmissive = aoMetalRoughnessEmissiveTexture.Sample(pointClampSampler, psInput.textureCoord);

const float3 position = positionEmissive.xyz;
const float3 normal = normalize(normalEmissive.xyz);

const float ao = aoMetalRoughnessEmissive.r;
const float metallicFactor = aoMetalRoughnessEmissive.g;
const float roughnessFactor = aoMetalRoughnessEmissive.b;

const float3 emissive = float3(positionEmissive.w, normalEmissive.w, aoMetalRoughnessEmissive.w);
We also need to render a full-screen quad/triangle before the pixel shader is invoked and we have to pass the correct texture coord values (for visiting each pixel in the G Buffer), which will be used to sample into the G Buffer textures correctly. To render a full-screen triangle, the vertex shader will look as follows :
struct VSOutput
{
    float4 position : SV_Position;
    float2 textureCoord : Texture_Coord;
};

VSOutput VsMain(uint vertexID : SV_VertexID)
{
    static const float3 VERTEX_POSITIONS[3] = {float3(-1.0f, 1.0f, 0.0f), float3(3.0f, 1.0f, 0.0f), float3(-1.0f, -3.0f, 0.0f)};

    VSOutput output;
    output.position = float4(VERTEX_POSITIONS[vertexID], 1.0f);
    output.textureCoord = output.position * float2(0.5f, -0.5f) + float2(0.5f, 0.5f);
    return output;
}
Advantages and Drawbacks of Deferred Shading.
Let’s focus on the advantages first.
We perform shading calculations only on the pixels that matter for the current frame, which can also be very beneficial if the scene is fairly complex with a lot of objects and also has a lot of lights.
The G Buffer data can be used for other techniques as well. For instance, Screen Space Ambient Occlusion (SSAO) can utilize the view space normal and position data from the G Buffer to randomly orient hemispheres around the view space surface normal, and then use this result to sample into the position buffer to find the occlusion factor of a given pixel.
[This is just a simple example of using the G Buffer to perform screen space rendering techniques 😄]
However, there are a few notable drawbacks of this technique.
The Geometry Buffer is extremely memory intensive (for an R16G16B16A16_FLOAT format, each pixel requires 64 bits, and in a 1920 x 1080 texture that is 1,65,88,800 bytes 😵)
If our scene only has a few lights, forward shading could potentially be more performant than deferred shading with a lot less memory bandwidth utilization. This is something we need to keep in mind as it is scene / application dependent.
Also, all of our objects would have to utilize the same shading algorithms (i.e using the same pipeline state). This can be overcome by storing material and shading specific data for each object, but this is not a very elegant solution.
Moreover, blending becomes a lot harder to achieve. We need to break up the renderer into two phases: A deferred pass for the opaque objects, and a forward render pass for the transparent / translucent objects. Light visualizers must also utilize forward rendering.
Note❗: For the forward rendering phase, be sure to either copy / use the depth buffer used during the Geometry Pass Phase in the deferred render stage!
Closing Thoughts
Deferred shading is a really simple rendering technique that gives you the capability to add a lot of lights in the scene, potentially improve the performance of complex scenes and worlds, and open doors to several exciting screen space algorithms due to the per-pixel data stores in the GBuffer (geometry buffer).
There are a few notable disadvantages of using this technique, but in most cases, these can easily be overcome (as evident from the fact that despite the cons, deferred shading is THE standard/goto rendering method used by Games and Engines all over the world).
Thank you so much for your time! Feel free to leave comments if you felt something was lacking/incorrect or your opinions on my post! If you would like to reach out to me, head over to the Home page to find some contact links there.
More Detailed Resources
If you want to go deeper into deferred rendering, here are some resources I have found to be very helpful:
Learn OpenGL’s Deferred Shading article.
OGL Dev’s Deferred Shading tutorial.